> ## Documentation Index
> Fetch the complete documentation index at: https://dev.writer.com/llms.txt
> Use this file to discover all available pages before exploring further.
# Salesforce connector
> Connect WRITER Agent to Salesforce to query CRM data, manage records, run reports, and automate workflows
This guide shows you how to configure the [Salesforce](https://www.salesforce.com/) connector for WRITER Agent. After setting up this connector, WRITER Agent can query and manage CRM records, run reports, execute SOQL/SOSL searches, interact with Chatter, and automate Salesforce workflows.
## Set up the Salesforce connector
Configure the Salesforce connector in [AI Studio](https://app.writer.com/aistudio) under **Connectors & Tools**. The Salesforce connector supports two authentication options:
* **WRITER-managed OAuth** (recommended): Writer provides the OAuth application. No setup required—just authorize access to your Salesforce account.
* **Organization-managed OAuth**: Create your own Salesforce External Client Application for custom branding and control.
Most users should choose WRITER-managed OAuth for faster setup. Only use organization-managed OAuth if you need custom branding or have specific security requirements.
### Configure Salesforce
Before connecting, verify the following in your Salesforce environment:
1. Confirm that the Salesforce user account has API access enabled
2. Verify the user has appropriate permissions for the objects and operations you plan to use
3. Ensure any required Salesforce features (reports, Chatter, Bulk API) are enabled for your org
### Install the Writer app from Salesforce AgentExchange (WRITER-managed only)
If you choose WRITER-managed OAuth, install the Writer Salesforce Connector package in your Salesforce org from AgentExchange. A Salesforce admin must complete this step.
1. Go to the [Writer for Sales Personalization](https://appexchange.salesforce.com/appxListingDetail?listingId=68c1909f-4f6e-45cb-a07f-35afbeb421e5) listing on Salesforce AgentExchange
2. Select **Get It Now**
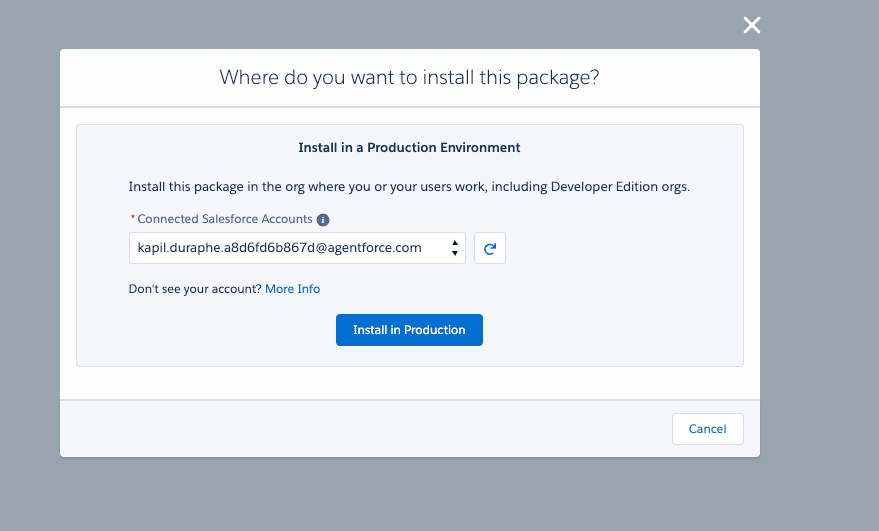
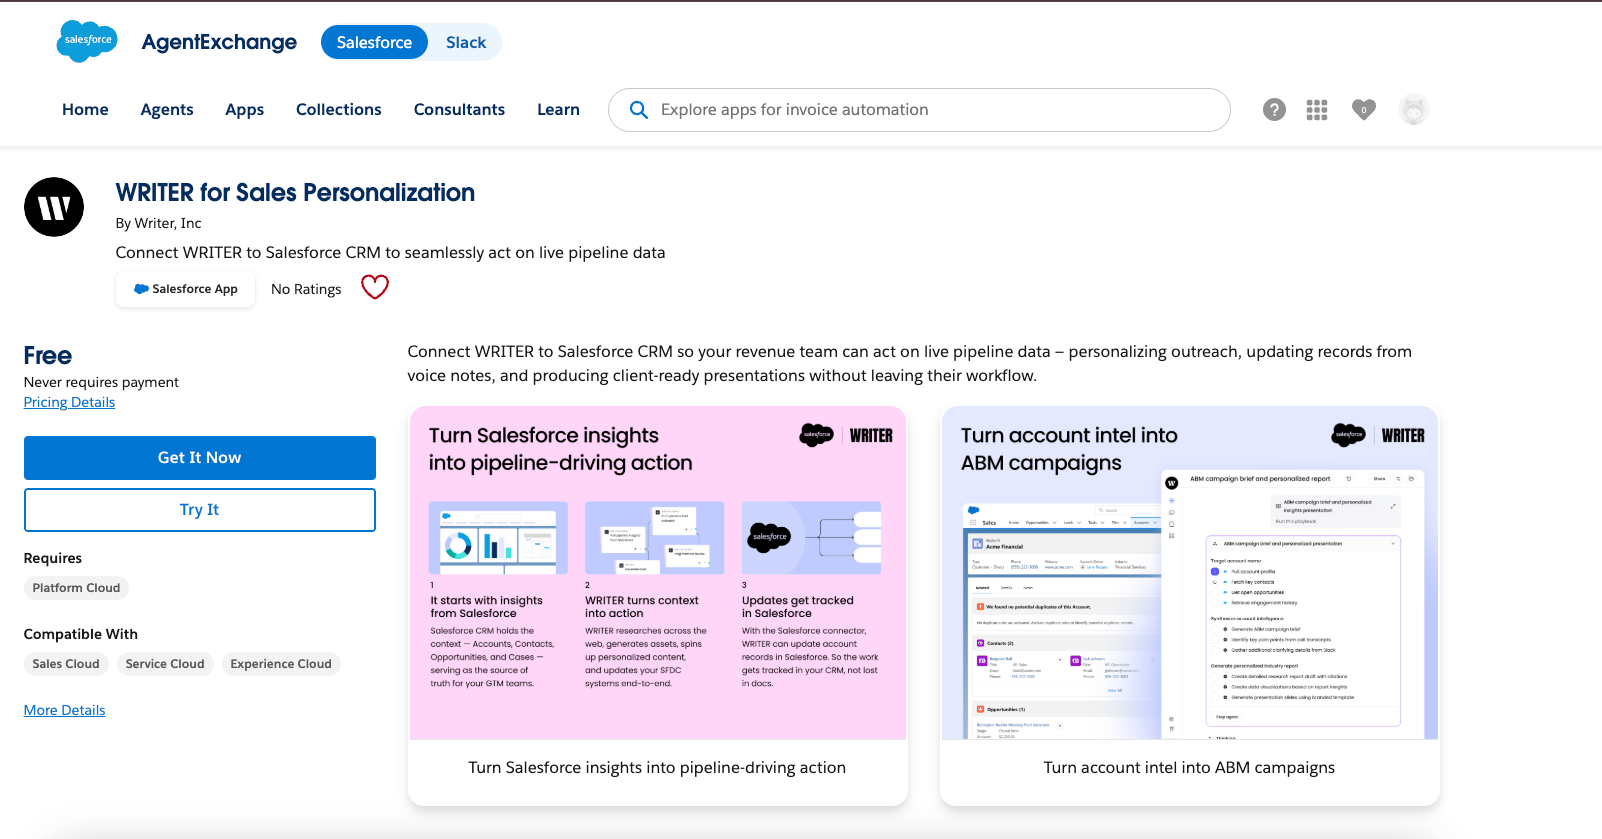 3. Select the Salesforce account to install the package into, then select **Install in Production**
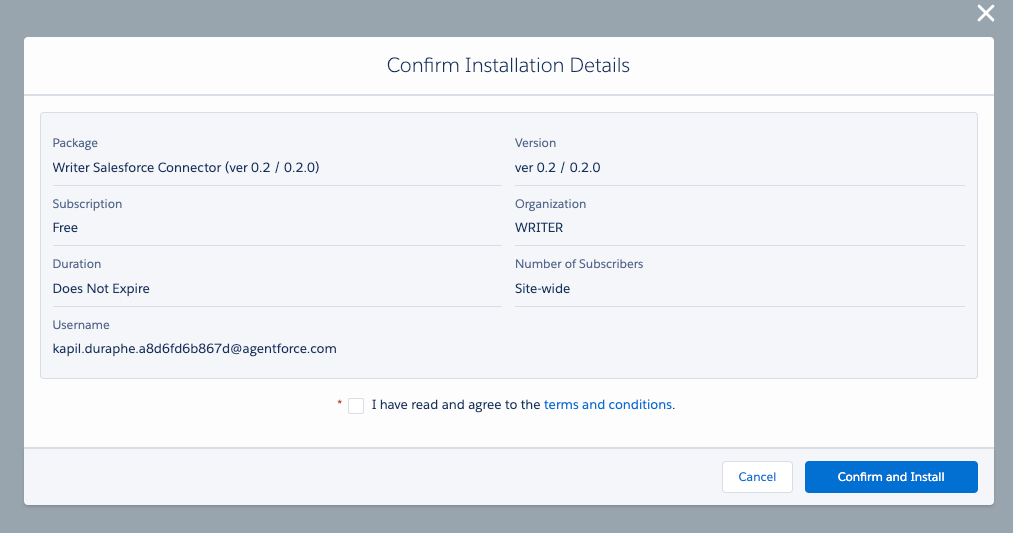
 4. Review the installation details, select the checkbox to agree to the terms and conditions, then select **Confirm and Install**
 5. Log in to Salesforce when prompted to continue the installation
6. Select **Install for All Users**, then select **Install**
7. Wait for the installation to complete, then select **Done**
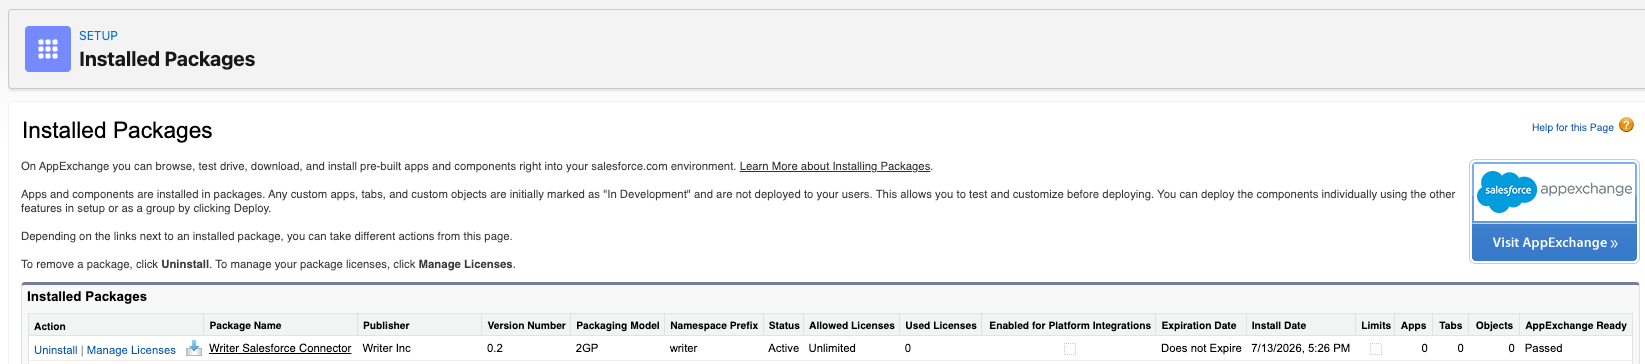
8. In Salesforce, go to **Setup** > **Installed Packages** and confirm that **Writer Salesforce Connector** appears in the list with a status of **Active**
5. Log in to Salesforce when prompted to continue the installation
6. Select **Install for All Users**, then select **Install**
7. Wait for the installation to complete, then select **Done**
8. In Salesforce, go to **Setup** > **Installed Packages** and confirm that **Writer Salesforce Connector** appears in the list with a status of **Active**
 ### Create a Salesforce External Client Application (organization-managed only)
If you choose to create a self-managed OAuth application to connect, create an External Client Application (ECA) in Salesforce:
1. In Salesforce Setup, search for **External** in Quick Find, select **External Client App Manager**, then select **New External Client App**
2. Complete the required fields in the **Basic Information** section
3. Expand **API (Enable OAuth Settings)** and select **Enable OAuth**
4. Add the Writer redirect URI to the **Callback URL**:
```
https://app.writer.com/mcp/oauth/callback
```
If your organization is deployed in the EU, use `https://app.eu2.writer.com/mcp/oauth/callback` instead.
5. Select the [required OAuth scopes](#required-oauth-scopes)
6. Configure [flow enablement settings](#flow-enablement-settings)
7. Configure [security settings](#security-settings)
8. Select **Create**
9. Go to the app's **Settings** > **OAuth Settings** and copy the **Consumer Key** and **Consumer Secret**
For detailed instructions, see [Salesforce's External Client Apps documentation](https://help.salesforce.com/s/articleView?id=xcloud.external_client_apps.htm).
#### Required OAuth scopes
* `api` - Manage user data via APIs
* `refresh_token`, `offline_access` - Perform requests at any time
* `openid` - Access unique user identifiers
* `sfap_api` - Access the Salesforce API Platform
#### Flow enablement settings
Under **Flow Enablement**, select the following options:
* Enable Client Credentials Flow
* Enable Authorization Code and Credentials Flow
* Enable Token Exchange Flow
* Require secret for Token Exchange Flow
#### Security settings
In the **Security** section, select the following options:
* Require secret for Web Server Flow
* Require secret for Refresh Token Flow
* Require Proof Key for Code Exchange (PKCE) extension for Supported Authorization Flows
* Enable Refresh Token Rotation
* Limit Idle Refresh Token Time-to-Live (TTL) to 30 Days
* Enforce Refresh Token IP Allowlist
### Configure the connector in AI Studio
1. Navigate to **Connectors & Tools** in [AI Studio](https://app.writer.com/aistudio)
2. Select the Salesforce connector
3. Select who has access by default (all users or specific teams)
4. Select the connection type:
* **Level**: User level (each user authenticates their own account) or org level (shared connection to a single account)
* **Managed by**: WRITER-managed or self-managed (your own OAuth app)
5. Select which tools to enable for your agents
6. On the **Connect** step, enter your **Tenant URL** in the format `{instance URL}/services/data/v62.0`, for example:
```
https://dummy.my.salesforce.com/services/data/v62.0
```
7. If using self-managed OAuth, also enter your **OAuth client ID** and **client secret**
8. Complete the OAuth authorization flow
## Install on a Salesforce sandbox
AgentExchange doesn't support installing packages directly into sandbox orgs. To try the Salesforce connector in a sandbox before deploying to production, install the package directly using a URL in the following format:
```
https://{tenant}--{sandbox name}.sandbox.lightning.force.com/packagingSetupUI/ipLanding.app?apvId=04tal000007CLflAAG
```
For example:
```
https://writer--demo.sandbox.lightning.force.com/packagingSetupUI/ipLanding.app?apvId=04tal000007CLflAAG
```
Then follow the same installation steps as [Install the Writer app from Salesforce AgentExchange](#install-the-writer-app-from-salesforce-agentexchange-writer-managed-only), starting from selecting the account to install the package into.
## Next steps
* [Set up connectors](https://support.writer.com/article/299-setting-up-connectors): Learn how to configure and enable connectors in AI Studio
* [Tool calling guide](/home/tool-calling): Understand how AI agents use tools in conversations
* [WRITER Agent guide](https://support.writer.com/article/293-how-to-use-action-agent): Learn how to use WRITER Agent with connected tools
* [MCP gateway overview](/home/mcp-gateway): Learn about Writer's MCP gateway architecture
### Create a Salesforce External Client Application (organization-managed only)
If you choose to create a self-managed OAuth application to connect, create an External Client Application (ECA) in Salesforce:
1. In Salesforce Setup, search for **External** in Quick Find, select **External Client App Manager**, then select **New External Client App**
2. Complete the required fields in the **Basic Information** section
3. Expand **API (Enable OAuth Settings)** and select **Enable OAuth**
4. Add the Writer redirect URI to the **Callback URL**:
```
https://app.writer.com/mcp/oauth/callback
```
If your organization is deployed in the EU, use `https://app.eu2.writer.com/mcp/oauth/callback` instead.
5. Select the [required OAuth scopes](#required-oauth-scopes)
6. Configure [flow enablement settings](#flow-enablement-settings)
7. Configure [security settings](#security-settings)
8. Select **Create**
9. Go to the app's **Settings** > **OAuth Settings** and copy the **Consumer Key** and **Consumer Secret**
For detailed instructions, see [Salesforce's External Client Apps documentation](https://help.salesforce.com/s/articleView?id=xcloud.external_client_apps.htm).
#### Required OAuth scopes
* `api` - Manage user data via APIs
* `refresh_token`, `offline_access` - Perform requests at any time
* `openid` - Access unique user identifiers
* `sfap_api` - Access the Salesforce API Platform
#### Flow enablement settings
Under **Flow Enablement**, select the following options:
* Enable Client Credentials Flow
* Enable Authorization Code and Credentials Flow
* Enable Token Exchange Flow
* Require secret for Token Exchange Flow
#### Security settings
In the **Security** section, select the following options:
* Require secret for Web Server Flow
* Require secret for Refresh Token Flow
* Require Proof Key for Code Exchange (PKCE) extension for Supported Authorization Flows
* Enable Refresh Token Rotation
* Limit Idle Refresh Token Time-to-Live (TTL) to 30 Days
* Enforce Refresh Token IP Allowlist
### Configure the connector in AI Studio
1. Navigate to **Connectors & Tools** in [AI Studio](https://app.writer.com/aistudio)
2. Select the Salesforce connector
3. Select who has access by default (all users or specific teams)
4. Select the connection type:
* **Level**: User level (each user authenticates their own account) or org level (shared connection to a single account)
* **Managed by**: WRITER-managed or self-managed (your own OAuth app)
5. Select which tools to enable for your agents
6. On the **Connect** step, enter your **Tenant URL** in the format `{instance URL}/services/data/v62.0`, for example:
```
https://dummy.my.salesforce.com/services/data/v62.0
```
7. If using self-managed OAuth, also enter your **OAuth client ID** and **client secret**
8. Complete the OAuth authorization flow
## Install on a Salesforce sandbox
AgentExchange doesn't support installing packages directly into sandbox orgs. To try the Salesforce connector in a sandbox before deploying to production, install the package directly using a URL in the following format:
```
https://{tenant}--{sandbox name}.sandbox.lightning.force.com/packagingSetupUI/ipLanding.app?apvId=04tal000007CLflAAG
```
For example:
```
https://writer--demo.sandbox.lightning.force.com/packagingSetupUI/ipLanding.app?apvId=04tal000007CLflAAG
```
Then follow the same installation steps as [Install the Writer app from Salesforce AgentExchange](#install-the-writer-app-from-salesforce-agentexchange-writer-managed-only), starting from selecting the account to install the package into.
## Next steps
* [Set up connectors](https://support.writer.com/article/299-setting-up-connectors): Learn how to configure and enable connectors in AI Studio
* [Tool calling guide](/home/tool-calling): Understand how AI agents use tools in conversations
* [WRITER Agent guide](https://support.writer.com/article/293-how-to-use-action-agent): Learn how to use WRITER Agent with connected tools
* [MCP gateway overview](/home/mcp-gateway): Learn about Writer's MCP gateway architecture